Make a Gorgeous White Chocolate Drip Cake at Home

If you’re looking for a show-stopping dessert that’s as delicious as it is visually stunning, a White Chocolate Drip Cake is the perfect choice. This cake is the epitome of elegance, with smooth, creamy white chocolate ganache cascading down the sides, creating a luxurious and professional-looking finish. Whether you’re celebrating a birthday, wedding, anniversary, or simply indulging in a sweet craving, this cake is bound to impress.
The beauty of a white chocolate drip cake lies not just in its aesthetic appeal but also in its taste. The combination of moist, fluffy cake layers and rich white chocolate creates a balanced, melt-in-your-mouth experience. Plus, the versatility of this recipe allows you to customize the cake flavors, fillings, and decorations to match any theme or occasion.
What You’ll Need for White Chocolate Drip Cake
Before diving into the baking process, it’s essential to have all the necessary ingredients and tools ready. Having everything prepped in advance will make the process smoother and more enjoyable.
Ingredients for White Chocolate Drip Cake
For the Cake:
- 2 ½ cups (310g) all-purpose flour – Provides structure to the cake.
- 2 ½ tsp baking powder – Helps the cake rise properly.
- ½ tsp salt – Enhances the flavors of the cake.
- 1 cup (226g) unsalted butter, softened – Adds richness and moisture.
- 1 ¾ cups (350g) granulated sugar – Sweetens the cake.
- 4 large eggs – Binds the ingredients and adds moisture.
- 1 tbsp vanilla extract – Enhances the overall flavor.
- 1 cup (240ml) whole milk – Keeps the cake soft and moist.
For the White Chocolate Ganache Drip:
- 1 cup (180g) white chocolate, finely chopped – The key ingredient for the drip effect.
- ½ cup (120ml) heavy cream – Helps achieve a smooth, pourable consistency.
For the Frosting:
- 2 cups (452g) unsalted butter, softened – Creates a creamy, rich base.
- 5 cups (600g) powdered sugar – Sweetens and thickens the frosting.
- 2 tbsp heavy cream – Ensures a smooth, spreadable consistency.
- 1 tsp vanilla extract – Adds a pleasant aroma and flavor.
Tools You’ll Need to make White Chocolate Drip Cake
- 3 (8-inch) cake pans – For even cake layers.
- Parchment paper – Prevents sticking.
- Mixing bowls – For preparing the batter and frosting.
- Electric mixer – Helps achieve a light and fluffy batter.
- Spatula – Essential for smoothing the frosting.
- Cake turntable (optional) – Makes decorating easier.
- Offset spatula – For even frosting application.
- Drip bottle or spoon – To apply the white chocolate drip smoothly.
Having all your ingredients and tools ready will ensure a seamless baking experience. Now that everything is prepped, it’s time to move on to the fun part—baking and assembling your White Chocolate Drip Cake!

How to Make White Chocolate Drip Cake
Now that you have all your ingredients and tools ready, let’s dive into the step-by-step process of making this stunning White Chocolate Drip Cake. Follow these instructions carefully to achieve a beautifully moist cake with a flawless white chocolate drip.
Step 1: Prepare the Cake Batter
- Preheat the Oven – Set your oven to 350°F (175°C) and grease three 8-inch cake pans. Line the bottoms with parchment paper for easy removal.
- Mix Dry Ingredients – In a medium bowl, whisk together flour, baking powder, and salt. Set aside.
- Cream Butter and Sugar – In a large mixing bowl, beat the butter and sugar with an electric mixer on medium speed until light and fluffy (about 3–5 minutes).
- Add Eggs and Vanilla – Beat in the eggs one at a time, ensuring each is fully incorporated before adding the next. Then, mix in the vanilla extract.
- Incorporate Dry Ingredients and Milk – Alternate adding the dry ingredients and milk, starting and ending with the dry ingredients. Mix until just combined—avoid overmixing to keep the cake tender.
- Divide and Bake – Evenly divide the batter among the three prepared cake pans. Bake for 22–25 minutes, or until a toothpick inserted in the center comes out clean.
- Cool the Cakes – Let the cakes cool in the pans for 10 minutes before transferring them to a wire rack to cool completely.
Step 2: Make the Frosting
- Beat Butter – In a large bowl, beat the softened butter on high speed for 2–3 minutes until creamy.
- Add Powdered Sugar – Gradually add the powdered sugar, mixing on low speed at first, then increasing to medium until fully incorporated.
- Add Vanilla and Heavy Cream – Mix in the vanilla extract and heavy cream until the frosting is smooth and fluffy. Adjust the consistency by adding more cream if needed.
Step 3: Assemble the Cake
- Level the Cake Layers – If needed, trim the tops of the cakes to create even layers.
- Frost the Cake – Place one cake layer on a serving plate, spread an even layer of frosting, then repeat with the remaining layers. Cover the entire cake with a thin crumb coat of frosting, chill for 15 minutes, then apply a final smooth coat.
Step 4: Make the White Chocolate Drip
- Heat Heavy Cream – In a small saucepan or microwave, heat ½ cup (120ml) of heavy cream until hot but not boiling.
- Melt White Chocolate – Pour the hot cream over the chopped white chocolate and let sit for 2 minutes. Stir until smooth. If needed, microwave in 10-second bursts until fully melted.
- Cool Slightly – Let the ganache sit for a few minutes to thicken slightly before applying.
Step 5: Decorate with the Drip
- Drip the Ganache – Using a spoon or squeeze bottle, apply the ganache around the edges of the cake, allowing it to drip naturally.
- Top with Decorations – Add extra decorations such as white chocolate shavings, sprinkles, or fresh berries for a beautiful finish.
- Chill Before Serving – Let the cake set in the fridge for about 20 minutes before slicing.

Serving and Storage Tips for White Chocolate Drip Cake
Now that your White Chocolate Drip Cake is ready, it’s time to enjoy it! Here’s how to serve it for the best experience and how to store any leftovers properly.
How to Serve
- Best Served at Room Temperature – Although the cake should be stored in the fridge, it’s best to let it sit at room temperature for 20–30 minutes before serving for a softer texture.
- Use a Warm Knife – For clean slices, dip a knife in hot water, wipe it dry, and then cut. This prevents the white chocolate ganache from sticking to the blade.
- Pairing Ideas – Serve with a cup of coffee, tea, or a glass of cold milk for a delightful treat. You can also complement it with a fruit sauce, such as raspberry or strawberry coulis.
How to Store
Short-Term Storage (1–2 Days)
- Store the cake in an airtight cake container at room temperature if your kitchen is cool. Otherwise, keep it in the fridge.
Refrigerator Storage (Up to 5 Days)
- Whole Cake – Cover loosely with plastic wrap or store in an airtight container to prevent it from drying out.
- Sliced Cake – Place slices in an airtight container and refrigerate. If needed, place a piece of parchment paper between slices to prevent sticking.
Freezing the Cake
- Unfrosted Cake Layers – Wrap each layer individually in plastic wrap and then in aluminum foil. Freeze for up to 3 months. Thaw at room temperature before frosting.
- Fully Assembled Cake – Flash freeze the cake uncovered for 1 hour, then wrap tightly in plastic wrap and aluminum foil. Freeze for up to 1 month. Thaw overnight in the fridge before serving.
By following these serving and storage tips, you’ll ensure your White Chocolate Drip Cake stays fresh and delicious for as long as possible!

Mistakes to Avoid for White Chocolate Drip Cake
Even experienced bakers can run into issues when making a White Chocolate Drip Cake. To help you achieve a bakery-level masterpiece, here are the most common mistakes to watch out for and how to avoid them.
1. Overmixing the Cake Batter
Overmixing the batter can result in a dense, tough cake instead of a light and fluffy texture. To prevent this:
- Mix just until the dry ingredients are incorporated.
- Use a low-speed setting on your mixer to avoid overworking the gluten.
- Scrape down the sides of the bowl to ensure even mixing without overdoing it.
2. Not Using Room Temperature Ingredients
Cold ingredients can prevent proper mixing and result in an uneven batter. Always:
- Take butter, eggs, and milk out of the fridge at least 30 minutes before baking.
- Softened butter should be pliable but not melted.
3. Skipping the Crumb Coat
A crumb coat is a thin layer of frosting applied before the final coat. If you skip this step:
- Crumbs may mix into the frosting, making it look uneven.
- The final layer won’t be as smooth and polished.
- Always chill the crumb-coated cake for 15–20 minutes before applying the final layer.
4. Drip Ganache Too Hot or Too Cold
Getting the perfect drip effect requires precise ganache temperature:
- Too hot? The ganache will run down the cake too quickly, creating a messy look.
- Too cold? It won’t flow properly, making uneven drips.
- Let the ganache sit for 5–10 minutes after melting until it reaches a pourable but thick consistency.
5. Applying the Drip on a Warm Cake
If your cake isn’t fully chilled, the white chocolate ganache will slide off instead of forming clean drips. Always:
- Chill the frosted cake in the fridge for at least 30 minutes before adding the ganache.
6. Using the Wrong Type of White Chocolate
Not all white chocolates melt well. Avoid using:
- White chocolate chips (which contain stabilizers that prevent smooth melting).
- Low-quality white chocolate (it can seize or become grainy).
- Use high-quality white chocolate bars for a smooth, glossy finish.
By keeping these mistakes in mind, you’ll avoid common pitfalls and create a stunning, professional-looking White Chocolate Drip Cake!

Tips and Tricks for White Chocolate Drip Cake
Now that you know what not to do, here are some expert tips and tricks to take your cake to the next level.
1. Use Cake Strips for Even Layers
Want perfectly flat cake layers without doming?
- Soak cake strips in water and wrap them around the pans before baking.
- This ensures even baking and prevents the edges from cooking faster than the center.
2. Make the Cake in Advance
- Bake the cake layers a day ahead and wrap them in plastic wrap. This allows the flavors to develop.
- Chilling the cake layers before assembly makes frosting easier and reduces crumbs.
3. Achieve Ultra-Smooth Frosting
- Use an offset spatula and a cake scraper for a professional finish.
- Dip the spatula in warm water, wipe it dry, then smooth out the frosting.
- Apply a thin crumb coat before the final layer for a cleaner look.
4. Test the Ganache Consistency Before Dripping
To check if your white chocolate ganache is the right consistency:
- Take a small spoonful and let it drip down the inside of a glass.
- If it flows too fast, let it cool longer.
- If it’s too thick, microwave for 5 seconds and stir.
5. Use a Squeeze Bottle for Perfect Drips
While you can use a spoon, a squeeze bottle gives better control.
- Start with small drips and increase as needed.
- Rotate the cake as you go for an even look.
6. Decorate with Style
For an elegant touch, try:
- Gold leaf or edible pearls for a luxurious look.
- Fresh berries or flowers for a natural aesthetic.
- White chocolate curls made with a vegetable peeler.
7. How to Cut a Perfect Slice
- Use a sharp serrated knife and wipe it clean between cuts.
- For cleaner slices, chill the cake for 15 minutes before cutting.
Following these tips will make your White Chocolate Drip Cake look and taste like it came straight from a high-end bakery!

Suggestions for White Chocolate Drip Cake
There are countless ways to customize your White Chocolate Drip Cake to suit different tastes, occasions, and dietary needs. Whether you want a unique flavor twist or an eye-catching design, here are some great suggestions to elevate your cake.
1. Flavor Variations
If you want to go beyond classic vanilla, consider these tasty variations:
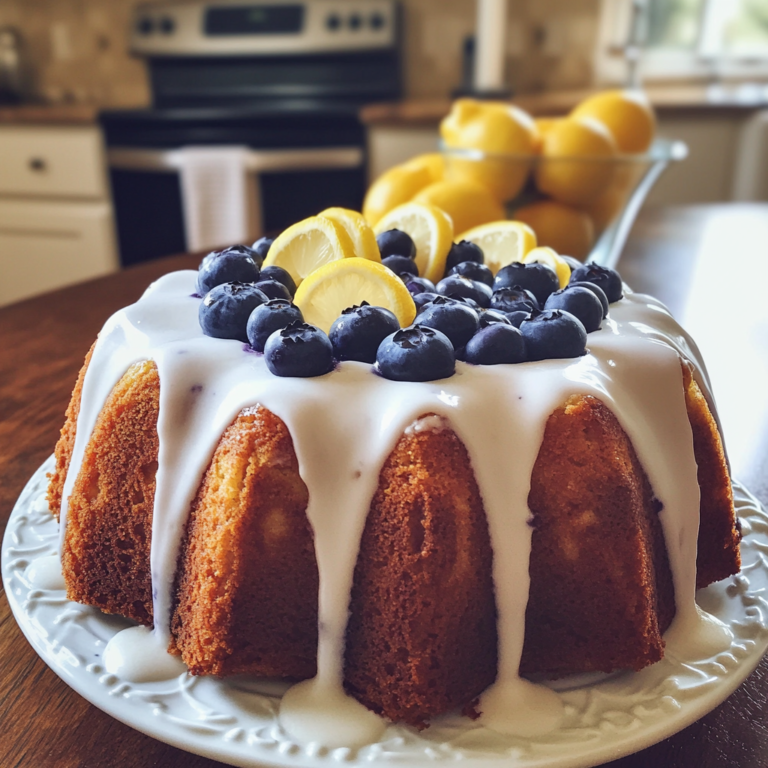
- Lemon White Chocolate Cake – Add 2 tablespoons of lemon zest and 1 teaspoon of lemon extract to the batter for a fresh citrusy touch.
- Almond White Chocolate Cake – Replace vanilla extract with almond extract and top with toasted almonds for a nutty flavor.
- Strawberries and Cream Cake – Fold chopped fresh strawberries into the batter and layer the cake with strawberry preserves.
- Coconut White Chocolate Cake – Use coconut milk instead of regular milk in the batter and top with shredded coconut.
- Mocha White Chocolate Cake – Add 1 tablespoon of espresso powder to the cake batter for a subtle coffee kick.
2. Colorful Drip Designs
White chocolate ganache is easy to tint with food coloring! Try these fun designs:
- Pastel Colors – Add gel food coloring to create a soft pink, blue, or lavender drip for baby showers or birthdays.
- Ombre Effect – Use multiple shades of the same color for a beautiful gradient effect.
- Metallic Finish – Mix a tiny amount of edible gold or silver dust into the ganache for a shimmering look.
3. Fun Fillings
Want a surprise inside your cake? Try these delicious fillings:
- Raspberry or strawberry compote for a fruity contrast.
- Cookies and cream frosting for a crunchy twist.
- Salted caramel for a sweet and salty combination.
- Chocolate mousse for an ultra-decadent center.
4. Creative Cake Toppers
A stunning cake topper makes your dessert extra special. Try:
- Fresh flowers (make sure they’re food-safe).
- Chocolate curls or shavings for an elegant touch.
- Macarons or meringues for added texture.
- Sprinkles or edible glitter for a festive look.
5. Gluten-Free or Dairy-Free Options
If you or your guests have dietary restrictions, you can modify the recipe:
- For a gluten-free cake, use a 1:1 gluten-free flour blend in place of all-purpose flour.
- For a dairy-free cake, use almond milk or coconut milk instead of regular milk, and swap butter for vegan butter.
- For a vegan option, replace eggs with flax eggs (1 tbsp ground flaxseed + 3 tbsp water per egg).
With these creative suggestions, you can customize your White Chocolate Drip Cake for any occasion!

FAQ about White Chocolate Drip Cake
Got questions about making the perfect White Chocolate Drip Cake? Here are answers to the most common concerns.
1. Why is my white chocolate ganache too thin or too thick?
- If your ganache is too thin, it may have too much cream. Try refrigerating it for 5–10 minutes to thicken it.
- If your ganache is too thick, microwave it for 5 seconds at a time, stirring in between, until it reaches a pourable consistency.
2. Can I use white chocolate chips instead of a chocolate bar?
White chocolate chips contain stabilizers that make them harder to melt smoothly. It’s best to use high-quality white chocolate bars for a glossy and creamy drip effect.
3. How do I get clean, even drips?
- Let the ganache cool slightly so it’s thick but still pourable.
- Use a squeeze bottle or spoon to apply the drip slowly.
- Make sure the cake is fully chilled before adding the drip.
4. Can I make this cake ahead of time?
Yes! Here’s how:
- Bake the cake layers up to two days in advance, wrap them tightly in plastic wrap, and store them at room temperature.
- Make the frosting the day before and store it in the fridge. Let it soften before using.
- Assemble and decorate the cake the night before and store it in the fridge until serving.
5. How do I prevent my cake from being dry?
- Don’t overbake! Check for doneness with a toothpick—it should come out with a few moist crumbs.
- Use buttermilk or sour cream in the batter for extra moisture.
- Store the cake properly by wrapping it in plastic wrap to prevent drying out.
6. Can I freeze this cake?
Yes! You can:
- Freeze the cake layers (wrapped in plastic wrap) for up to 3 months.
- Freeze the fully decorated cake for up to a month. Thaw overnight in the fridge before serving.
7. What’s the best way to store leftovers?
- Keep the cake in an airtight container in the fridge for up to 5 days.
- Let slices sit at room temperature for 10–15 minutes before serving for the best texture.

Conclusion for White Chocolate Drip Cake
Making a White Chocolate Drip Cake may seem intimidating at first, but with the right techniques, ingredients, and a bit of patience, you can create a stunning and delicious dessert. This cake is perfect for birthdays, weddings, baby showers, or any special occasion where you want to impress your guests with a bakery-quality treat.
Why This Cake is Worth the Effort
This cake stands out not only for its beautiful aesthetic but also for its luxurious taste and texture. The soft and moist cake layers, paired with a rich and creamy frosting, create the perfect balance of sweetness. The white chocolate ganache drip adds an elegant finish, making it a showstopper on any dessert table.
Recap of Key Tips
To ensure your White Chocolate Drip Cake turns out perfectly every time, keep these essential tips in mind:
- Use high-quality white chocolate for a smooth and glossy ganache.
- Chill your cake before adding the drip to prevent it from running too much.
- Measure ingredients accurately and follow baking techniques to achieve a moist and fluffy cake.
- Get creative with flavors and decorations to make the cake unique to your occasion.
Share Your Baking Experience
Baking is a fun and rewarding experience, especially when you get to share your creations with family and friends. If you try this White Chocolate Drip Cake, we’d love to hear from you! Share your results, modifications, or questions in the comments.